Wednesday, November 28, 2012

We got the boat flipped over and sitting upright

Well, last week we got the boat flipped over and sitting upright.  I decided to use 4 chain hoists on my A frame lifts instead of having a bunch of people come over.  I figured someone would have too much to drink and end up getting crushed under the boat!

Well, I didn't take any pictures of the actual flip, because I was trying to do it by myself and I was nervous.

About halfway over, with one side of the boat 10 feet straight up in the air and stuck, I called Johnnie for some help.  I had one side of the boat stuck in the dirt and the other side stuck on the A frame.

John came over and promptly told me to cut off about a foot of my 2x6 boards that were bolted across the gunnels and were currently dug into the ground.  A few minutes later with the help of Mr. Sawzall, the boards were cut, the boat was free and setting on the jig, right side up!


Saturday, November 10, 2012

I finally got the boat painted!

Well after about a month of weather delays, yesterday I got the boat painted.  I faired the boat as smooth as I was willing to go with it.  I used epoxy with microballons added as a filler.  Then I sanded, filled, sanded, filled.......Sprayed a heavy high build epoxy primer....Sanded, filled...Sprayed more high build epoxy primer....Sanded filled and sanded.

Here is the paint I used to cover the boat with.  Dupont's Imron.  I used the Imron 3.5 HG version.  This paint is an industrial coating designed for firetrucks, 18 wheelers, airplanes, buildings, bridges, marine structures.  The paint is very easy to work with, and very forgiving regarding temperatures and environment.   Subsequent coats burn into previous coats very easily, much like the old school lacquers.

The biggest drawback is the hazard from the fumes.  The VOC's in this paint are very nasty.  There are rumors that persons exposed to the fumes without protection have about a 20% chance of getting chemical induced asthma!  Needless to say, I wore a 3M respirator mask designed just for this purpose with Organic Vapor cartridges.  Here are the cartridges after spraying the green paint.
This 3m respirator worked fantastic, I could not smell ANY paint fumes while wearing it.  If you spray paint, get one of these!

First I put on the very bottom color, the part that will be under the water.  It is a nice light beige / cream color.  It is kind of hard to see in these pictures.

Next I masked off the waterline with the 3M green masking tape, then masked off the cream colored area with masking paper.

I put three coats of paint on the boat.  It took about 1 1/2 gallons of cream color, and about 1 1/3 gallons of the green color to paint three coats.

Now I just have to wait about a week for the paint to cure really hard, then we are going to flip this thing over and build the inside!


Friday, October 12, 2012

Epoxy Primer Sprayed - Big Yellow Banana Boat!

Yesterday I sprayed the Maxx Fill epoxy primer.  Everything came out very nice.  I can now clearly see the areas that I have to go back and fair in a little better.  Todd and John were right, now the primer is on you can see the good and bad areas much better.


Turned out very well, today I am going to start the final fairing process and get ready for the Hunter Green Imron paint.

Wednesday, October 10, 2012

Getting ready to spray some epoxy primer tomorrow on the hull...finally!

I have had a couple of long business trips this past month, and when I wasn't away at work, it seemed to be raining every day here in Florida.  Needless to say, the progress on the boat slowed down the last month.

However, I did finally get the hull ready to spray 2 part epoxy primer tomorrow!

I finished the spray rails and put two more coats of epoxy on the boat.  Then we went over the entire boat with the cheese grater (surform).  Then I gave it a scuff sanding with some 180 grit to get it ready for paint.


 Lovebugs have been everywhere!
 Here it is, just before the scuff sanding.  Basically ready for epoxy primer!

I have decided to use Imron 3.5 high gloss for the top coat paint.  After much research and studying MSDS's (real fun, I am an exciting guy, I know) I believe that marine paint and good quality urethane car paint is virtually identical, with the car paint being better in most cases.  The most durable and time tested paint for painting airplanes, firetrucks, 18 wheelers, bridges, buildings and industrial structures has been Dupont's Imron paint.  I figured if it was good enough for a 747 jet, it was good enough for my boat.

Also, there are many flavors of Imron paint.  From around $65 a gallon up to the $500 range.  The biggest difference is that the top dollar paints are available in the most striking colors and have the potential to have the nicest gloss and shine.  In order to realize this potential of a $500 gallon of paint, you need to be in a $100,000 spray booth and be using a $800 spray gun and have already done MANY hours of prep work.

Since I am painting outside, this would be a complete waste of money.  The Imron 3.5 High Gloss is a top quality industrial coating, designed for trucks, planes, bridges, marine structures and generally anything that needs a super tough, long lasting paint job.  This is a very economical paint.  The white with the activator is around $100 a gallon, and the dark green is around $160 for the gallon kit.  This is around half the price of a typical 2 part marine urethane paint.

Since my fairing job is not the greatest, and I am ready to move on with project and go fishing instead of filling and sanding, I decided (with advice from Todd and Johnny) to start spraying epoxy primer.  I went to the auto paint store and got 3 gallons of high build, 2 part epoxy primer.


 I am using Maxx Fill 2k epoxy primer, in Buff color.  I hope to get 3 coats on the boat and get a really nice, thick primer to hide the imperfections.  I am not using the spray gun in the picture.  I am going to try to use my HVLP Turbine spray unit that I use for my woodworking projects and see how that does.

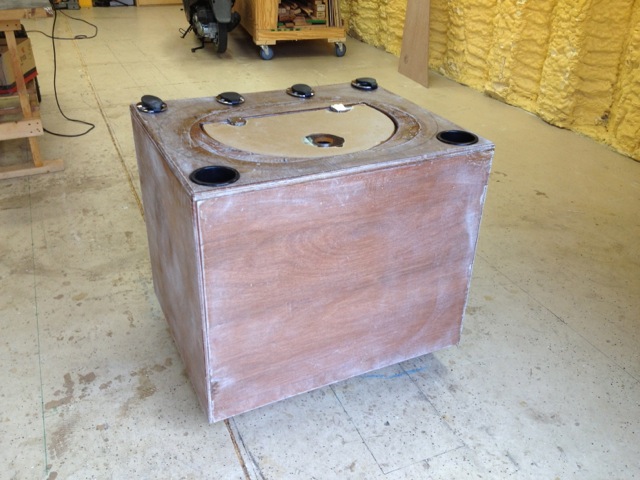
I also got a substantial amount of work done on the livewell.  Here it it mocked up with the rod holders, cup holders, lid and tank in place.  I have an access door to service and operate the plumbing valves.  Probably the most complicated livewell around, but it should keep the fish alive!


 Tomorrow I will be spraying the epoxy primer, so hopefully I will have a giant yellowish colored boat this time tomorrow!

When I was in Connecticut, I saw this bait shop with the coolest sign outside.  Here it is, pretty cool, right?!


Thursday, September 13, 2012

Almost forgot to install the spray rails!!!

Well I was getting ready to start doing the final fairing on the hull today, and hopefully get ready for paint next when I remembered that I had not installed the spray rails yet.

So I started ripping down Meranti plywood at 3/4 and 1 1/2 wide to make the spray rails.  I used a simple 45 degree miter to join them together.

I decided just take the 8 foot long pieces of spray rail out to the boat and install then one at a time, instead of making one long piece.  I glued the first rail on and held it in place with screws and fender washers.  Then repeated the process.  No problem, as long at they dont fall off when I take the screws off!

I have to add an additional 3/8 piece tomorrow to finish the main spray rail.

Here are the pictures: