Monday, February 25, 2013

Cuddy Cabin Looking Good


Well, the next step in continuing the cuddy cabin was to get the anchor well prepped and painted so that I could install the bulkhead between the anchor well and the cuddy cabin.

Tolman skiffs and Great Alaskan boats do not have an anchor well.  They have a kind of "tub" in the front for holding the rope and anchor, usually in a milk crate.  This is a great, simple solution, but I wanted something different.  

I wanted a windlass on my boat, so I needed a large, deep well to hold the chain and rode.  My solution was to simply make the front deck area flat, and put a bulkhead up to create the chamber.
 Here is the front of the bow after being painted.

 Here is the bulkhead I made being test fit before glassing.  I am planning on installing a large hatch so that you can access the inside of the anchor well from the cuddy cabin.

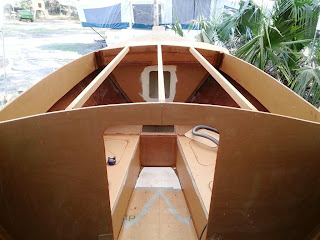
Next I installed the three roof supports for the cuddy.  I decided to install the anchor well bulkhead before putting on the roof.

The three roof supports are in and now it is time to put on the roof.  I needed to scarf two pieces of plywood together for the roof.  I decided to try a different method, and it worked great. 

First I cut the scarf using my circular saw jig.  I was using 1/2" plywood for the roof, so the saw did not cut all the way through, so I just finished cutting through with a pull saw.  It went fast and worked great.

Next, I layed out 6 sawhorses so the two panels were supported.  I put plastic under the spots on the horses where the epoxy would squeeze out.

I painted the joints with plain epoxy until they would not soak anymore in, then buttered them up with thickened epoxy glue.

What I did different was I screwed the first panel down to the sawhorses so it would not move, then placed the other panel in position .  Then I screwed that panel down onto the horses.  Finally, I used some fine threaded sheetrock screws to draw the scarf together and get the joint right.  Then I used a scraper to spread the squeeze out back into the joint and scrape it flush.

When it dried, it was the smoothest and straightest scarf joint I had made yet.
Here are a couple of pictures.  The first is the panels lined up on the horses.  The second is a closeup of how smooth the joint turned out.

 Here is the cuddy just before installing the roof.
 Putting the roof on was pretty straightforward. I installed temporary blocks around the perimeter of the cuddy cabin, then I put glue around the edges and supports.  I dropped the roof on top and screwed it down.


Afterwards I trimmed the roof overhang off with the harbor freight vibrating multi-tool.  (probably the best bargain in the tool industry!), and rounded over with a belt sander.

Now the roof is ready for glassing.
Next up is to glass the roof, clean up the inside of the cuddy and then paint it and it will be done!  On to the pilot house after that!


Saturday, February 2, 2013

Getting a lot of work done on the cuddy cabin

I have been working on the cuddy cabin.  Having a self leveling laser has been extremely helpful in this boat build.  I have used it for numerous purposes, most recently for finding and marking the height of the bunks all around the inside of the cuddy cabin, and for marking the cut off line on the cuddy cabin sides.  I highly recommend one!

 First up after getting the front collision chamber built it the front cuddy bulkhead.  I wanted the bulkhead to be angled back at the correct angle, so I build these blocks out of plywood to hold it at the right angle.

 Here is the bulkhead after fitting, cutting and gluing in place.
 Here it is about to get a little fiberglass tape.
I also installed the blocking under the deck for the aft cuddy bulkhead.  I had some leftover 1-1/4" plywood leftover from making the shelves, so this worked perfect.  I made a template from cardboard, cut them out and glued them in.

I also installed some fiberglass drain tubes that I plan to leave a drain plug in them at all times.  The only reason they will drain is if water somehow gets in the front cuddy, or if I have to wash it out.
Next up is building the aft cuddy bulkhead.  This was easier than I thought.  I took several measurements using a laser "tape measure".  Then I transfered the marks and the correct angles to a sheet of plywood and cut it out.  I was almost a perfect fit the first try.


Then I filled and taped all the seams and reinforced the area around the bottom of the door.


 Here you can see the doubler that I made as well.  Instead of making this and installing seperately, I just attached it to the bulkhead and installed it as one piece.


Now it was time to start building the cuddy bunks, but first I have to put down a floor in the cuddy cabin.  Making the template was once again easy with the laser level and a tape measure.  I used the laser to shoot a level horizontal line where I wanted the floor to be and traced it out with a Sharpie.  Then I took a bunch of measurements and cut out a floor from plywood.  I glassed both sides of the floor.
I also wanted to make a drop in to use the small storage area under the cuddy floor.  Here is a closeup of the drop in floor panel.
I used some heavy 12 ounce woven roving for the topside to allow some non-skid effect.
I epoxied the floor in place with a heavy fillet around the edge and then taped it in.  Very solid and sturdy.
 I did not put a stringer under the deck because it is rock solid without it.  If I need one, I will put one in.
Making the bunks was very straightforward.  I used a straight piece of plywood and glued it in.  Then I installed some blocking to support the top of the bunks.
 I also painted the inside of the bunks and under the cuddy deck.  Now or never!  I am using Glidden Poly Porch paint for most of this type of painting.  Great paint.


Finally I made the bunk tops.  I made a template out of cardboard, then cut them out of plywood.  I also added two drop ins on each bunk to allow storage underneath.  I did not install them yet, but they are ready.
Next up is to install the cuddy sides, and roof.  Hope to get this done this week.