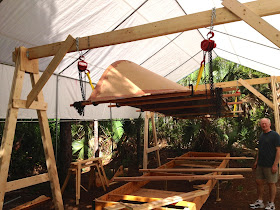
First order of business was to build a lifting gantry crane. After consulting with my dad and my good buddy Joe, it was decided that I needed to build a gantry crane to move this boat around. Otherwise, someone was going to get hurt. Plus getting volunteers to move heavy objects at 95 degrees and 98% humidity is a little tough.
So it was settled on an A frame design. In typical Stancil fashion, the A frame was designed to probably lift four boats at one time. So just one should be a snap. My dad always said, "If stout is good, then stouter is better."
Off to Lowes for a supply of lumber. You would think I was building a house.
Here is my beautiful daughter Hannah! She was helping me get the lumber.
What could possibly go wrong with hauling 16 foot long lumber from a pickup truck. Well, luckily nothing.
My dad came up for a visit, and he quickly designed and framed up a very impressive A frame gantry crane. We assembled it, hooked up the chains, and then before you knew it, the boat bottom was 10 feet in the air!
This is my dad, Kenneth. He really is as grumpy as he looks, too! Smartest man I know. Without the things he taught me when I was growing up about building and handyman stuff, none of this would be possible. He also taught me by example how to be a good husband, father and man.
OK, after the boat hull bottom was out of the way, it was time to lay the shelf jigs in place and install the shelves. After a bit of measuring that the 3 stooges would have been proud of, we got them lined up and installed.
Not a bad fit for being 30 foot long, first shot at aligning them!
Next up was installing the stem. After doubling up a couple of 14' 2x6's and installing a plywood support on the front, the stem was installed. It was amazing how poor the quality of the dimensional lumber you get nowadays. We had to twist and shim the 2x6's to get them in line. But, after a few minutes, the stem was looking good!
Here is the stem and bow after gluing them up. Everything fits really nice with the standard angle cut on the stem from the plans.
Sighting down the keel line, everything is square and level.
Next up was installing the jigs to support the transom. There are two of these and they were easy to install. I just hung a plumb bob down and centered the stringer spacer at the top out.
Now it is time to install the transom. First I had to cut some pockets out of the transom for the shelves to fit into. A few minutes with the router and they were ready to go.
I cut the pockets out larger than needed, so I would get a lot of epoxy in there as well.
After that, I called over John and the kids, and we installed the transom. Perfect 14 degree angle. We also finished right before a major thunderstorm hit!
There it is! Big heavy solid transom!The transom is sitting on the shelves, and there are a couple of 2x4 that I cut to support it.
I got a nice pocket of epoxy in there for strength. This was a epoxy mixed with Cabosil, wood flour and a couple heavy spoons of ground fiberglass. This will be a strong joint
Up tomorrow: I am going to install the stringers and get the bottom of the boat fitted in. Hopefully I will get the stem shaped to the keel and be ready for epoxying the bottom to the transom and stringers!
Things are moving along really good!


Looks great love!!
ReplyDelete