Friday, October 12, 2012

Epoxy Primer Sprayed - Big Yellow Banana Boat!

Yesterday I sprayed the Maxx Fill epoxy primer.  Everything came out very nice.  I can now clearly see the areas that I have to go back and fair in a little better.  Todd and John were right, now the primer is on you can see the good and bad areas much better.


Turned out very well, today I am going to start the final fairing process and get ready for the Hunter Green Imron paint.

Wednesday, October 10, 2012

Getting ready to spray some epoxy primer tomorrow on the hull...finally!

I have had a couple of long business trips this past month, and when I wasn't away at work, it seemed to be raining every day here in Florida.  Needless to say, the progress on the boat slowed down the last month.

However, I did finally get the hull ready to spray 2 part epoxy primer tomorrow!

I finished the spray rails and put two more coats of epoxy on the boat.  Then we went over the entire boat with the cheese grater (surform).  Then I gave it a scuff sanding with some 180 grit to get it ready for paint.


 Lovebugs have been everywhere!
 Here it is, just before the scuff sanding.  Basically ready for epoxy primer!

I have decided to use Imron 3.5 high gloss for the top coat paint.  After much research and studying MSDS's (real fun, I am an exciting guy, I know) I believe that marine paint and good quality urethane car paint is virtually identical, with the car paint being better in most cases.  The most durable and time tested paint for painting airplanes, firetrucks, 18 wheelers, bridges, buildings and industrial structures has been Dupont's Imron paint.  I figured if it was good enough for a 747 jet, it was good enough for my boat.

Also, there are many flavors of Imron paint.  From around $65 a gallon up to the $500 range.  The biggest difference is that the top dollar paints are available in the most striking colors and have the potential to have the nicest gloss and shine.  In order to realize this potential of a $500 gallon of paint, you need to be in a $100,000 spray booth and be using a $800 spray gun and have already done MANY hours of prep work.

Since I am painting outside, this would be a complete waste of money.  The Imron 3.5 High Gloss is a top quality industrial coating, designed for trucks, planes, bridges, marine structures and generally anything that needs a super tough, long lasting paint job.  This is a very economical paint.  The white with the activator is around $100 a gallon, and the dark green is around $160 for the gallon kit.  This is around half the price of a typical 2 part marine urethane paint.

Since my fairing job is not the greatest, and I am ready to move on with project and go fishing instead of filling and sanding, I decided (with advice from Todd and Johnny) to start spraying epoxy primer.  I went to the auto paint store and got 3 gallons of high build, 2 part epoxy primer.


 I am using Maxx Fill 2k epoxy primer, in Buff color.  I hope to get 3 coats on the boat and get a really nice, thick primer to hide the imperfections.  I am not using the spray gun in the picture.  I am going to try to use my HVLP Turbine spray unit that I use for my woodworking projects and see how that does.

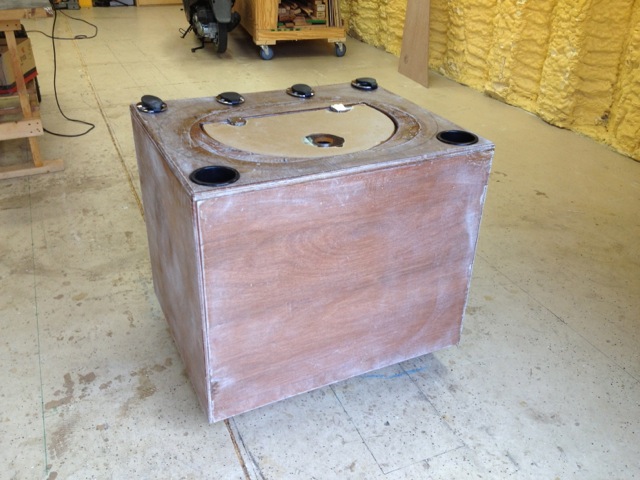
I also got a substantial amount of work done on the livewell.  Here it it mocked up with the rod holders, cup holders, lid and tank in place.  I have an access door to service and operate the plumbing valves.  Probably the most complicated livewell around, but it should keep the fish alive!


 Tomorrow I will be spraying the epoxy primer, so hopefully I will have a giant yellowish colored boat this time tomorrow!

When I was in Connecticut, I saw this bait shop with the coolest sign outside.  Here it is, pretty cool, right?!


Thursday, September 13, 2012

Almost forgot to install the spray rails!!!

Well I was getting ready to start doing the final fairing on the hull today, and hopefully get ready for paint next when I remembered that I had not installed the spray rails yet.

So I started ripping down Meranti plywood at 3/4 and 1 1/2 wide to make the spray rails.  I used a simple 45 degree miter to join them together.

I decided just take the 8 foot long pieces of spray rail out to the boat and install then one at a time, instead of making one long piece.  I glued the first rail on and held it in place with screws and fender washers.  Then repeated the process.  No problem, as long at they dont fall off when I take the screws off!

I have to add an additional 3/8 piece tomorrow to finish the main spray rail.

Here are the pictures:


Wednesday, September 12, 2012

Boat hull trimmed and final fiberglassing begins

OK, there has been quite a bit of work since the last update.

We had rain in Florida everyday for about a month.   Tropical storm Isaac also came by and dumped torrential rains.  During this time I worked on the bait tank.

I started by getting some extra pieces of 3/8 and 3/4 Meranti I had leftover, and I glassed both sides with some 6 ounce cloth.  Doing this on workbenches is very easy and fast.


 Then I assembled the pieces to make a simple box.  I used epoxy glue and few 18 gauge brad nails to hold it together while the glue dried.  Then I taped the inside seams and gave the exterior corners a round over.
 Next I built the piece that will hold the lid in place.  I wanted a slight baffle to stop the water from sloshing out of the tank, so I made a curved piece to fit the lid by cutting saw kerfs every 1/8 inch or so, all the way to the fiberglass cloth.  This made the wood flexible enough to bend.  Then I filled in the saw kerfs with epoxy glue.  The lid / rim is solid.

Then the rain stopped so it was time to work on the hull again.

First I trimmed off the side panels with a 1/2" straight bit with a flush cut bearing in my router.  The guide bearing follow the boat pretty well, and it cut though the 3/8" side panels no problem.  Well, not exactly....after I was done trimming, the router bit had turned blue from overheating, but the boat was trimmed!  After that I filled in the seams and applied 3 layers of glass over all the joints.
 After trimming with the router.


 Now it is time to put the final glass sheathing over the entire hull.  I faired in the rough spots and got it ready for glassing.  Then we hung 1/2 of the fiberglass and epoxied it in.  Today, I am going to trim off the excess glass, and finish the other 1/2 of the hull.


 After glassing the other half today, I will be ready to paint the bottom.  I think I am going to buy automotive 2 part urethane paint.  The technical term is " single stage, two part urethane enamel".  This is basically the same two part poly paint that you can get for boats, but it is about 1/3 the price, and you can only spray it, not roll it.  I think I am going to paint the hull Green Bay Packer Green, and the topsides a light tan / cream color.

Friday, August 24, 2012

All the side panels installed, we have a boat...

Well, today I got the other side of the boat covered with the four remaining side panels.  All the side panels are now complete.  All of the fabrication and construction on the basic hull is now finished.  Technically, I now have a boat!  If I flipped it over, it would float!

This time I started at the transom and just started installing the panels like I was sheathing a house.  They went on without any issues.  Next up, I have to trim and sand the panels and then get the entire hull bottom ready for fiberglassing.  Soon it will be time to paint the bottom and flip it over onto a trailer!


Tomorrow, trim the side panels off and start fairing and sanding.